I don’t have children and I don’t have pets, but I like raising living things anyway. I have a strong passion for fermented food and fermented bread aka sourdough bread.
This article will hopefully be a short memo explaining how I manage to keep my starta alive without baking all the time and without wasting too much flour. There are many ways to do that, this is only my method. I wish you can get inspired from it if you look for a simple way to make any sourdough baking with your healthy starta.
Create a starta
To create a starta from scratch you need :
- Baking flour or high grade flour (or a mix of wholemeal flour and bakers flour at equivalent proportion)
- Tap water aerated for 12 hours or boiled and cooled
- 1 large jar (the starta will get bigger as it’s activating)
It is important to be regular about the time you feed your sourdough.
Day 1: Mix 25 g of flour and 25 g of water (possibly a teaspoon of sugar/honey) in the jar, put the lid on it without closing it tightly (total weight: 50 g)
Day 2: At this stage the first bubbles form. Add 25 g of flour and 25 g of water, mix, close again (total weight: 100 g)
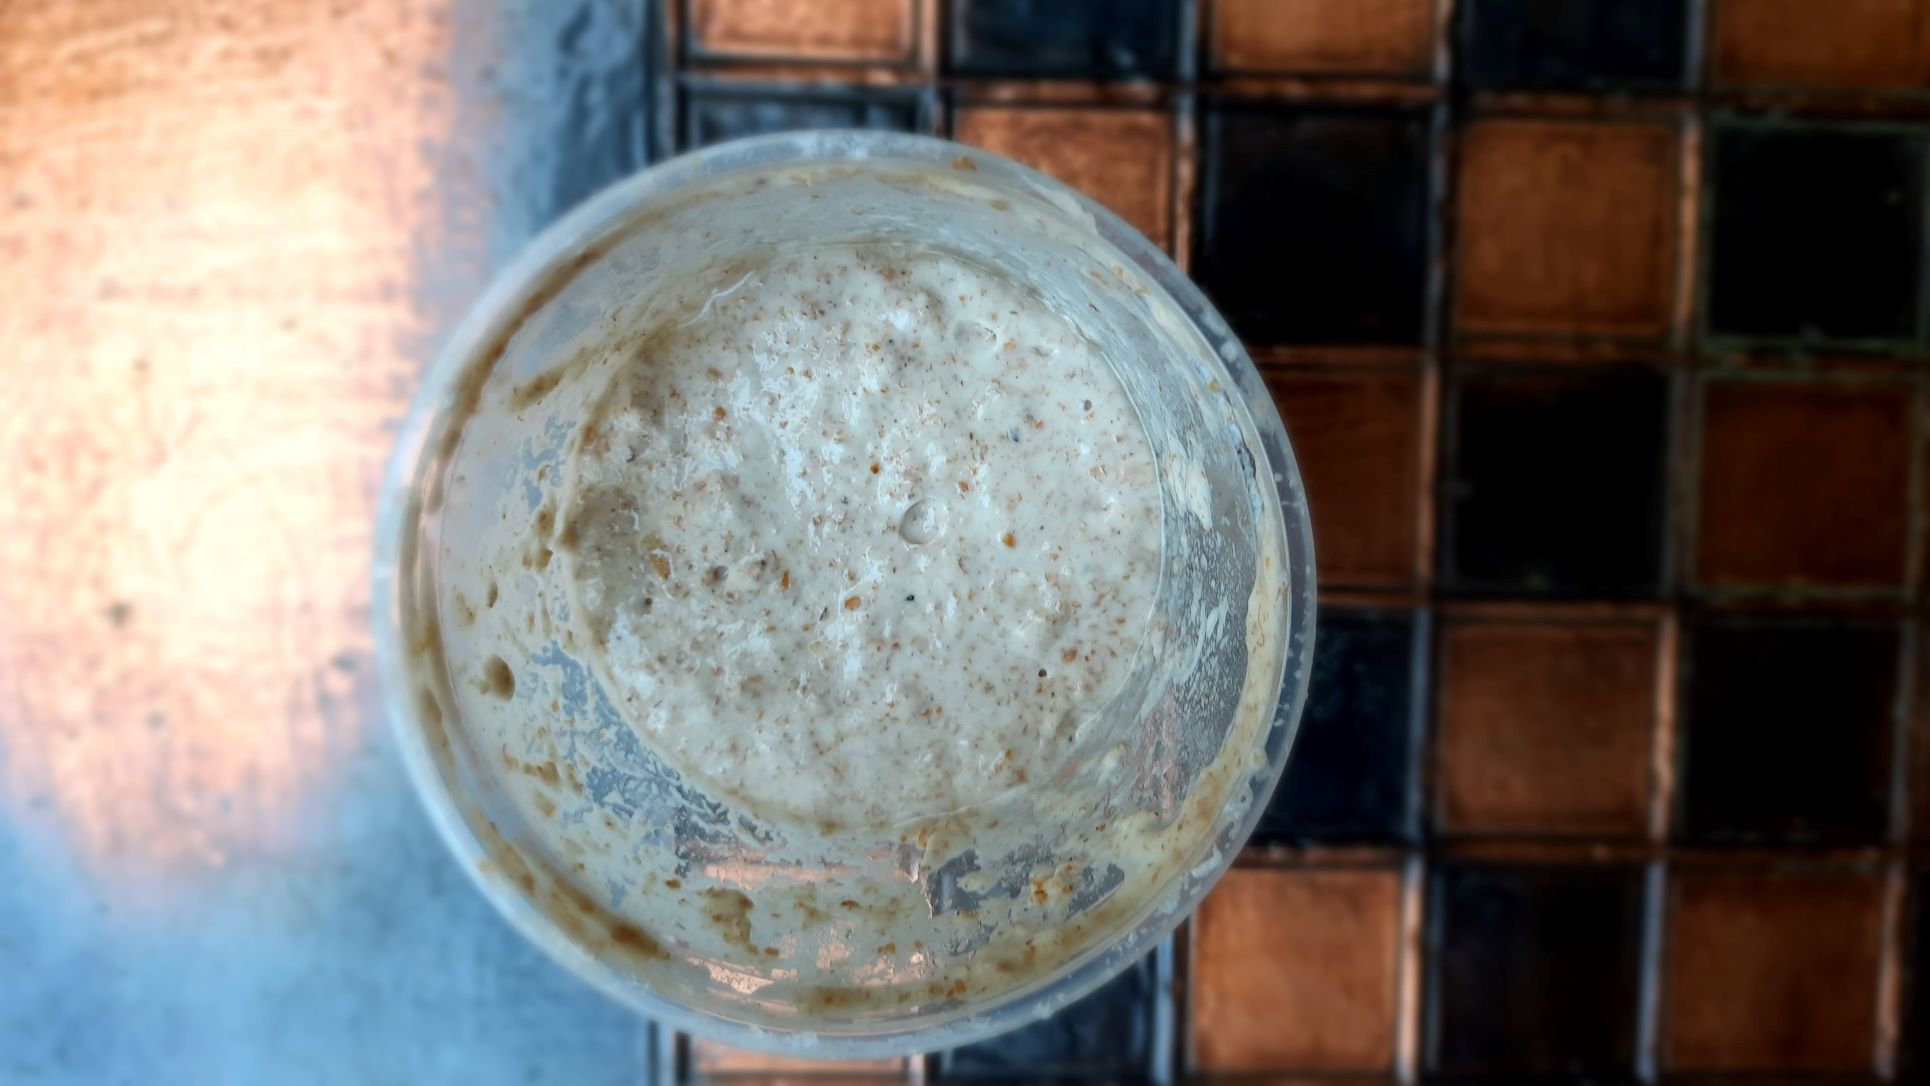
Day 3: At this stage there are more and more bubbles and the Starta starts to smell a bit sour. Add 50 g of flour and 50 g of water, mix and close (total weight: 200 g)
Day 4: At this stage there are many bubbles and your Starta has a foamy texture. Take out 100 g of sourdough (to use in cakes or pancakes) then add 50 g of flour and 50 g of water, mix and close (total weight: 200 g)
Day 5: same as day 4
As you can see, you always need to double the weight of the Starta, always using 50% flour and 50% water. If after 4-5 days you still do not see any bubbles, you can start again.
Yes, I have copied and pasted and translated that method from my sister’s blog because it’s what I used the last time I created a Starta. I invite you to visit her blog even if it’s in french, I’m sure google translate can help you. She have a slighlty different method to make sourdough bread.
You can also ask your favourite bakery or baker friend if they are willing to give you some of their Starta.
Using your Starta
Now you have your Starta, congratulations, please give it a lot of love and a name for the sake of it.
As you understand, to stay alive the starta needs to be fed, so it will always get bigger, you can then easily give some away or use it for any baking project to replace or complement yeast.
Most of the time when you want to use some Starta you actually need ‘active starta’. This means Starta that have been fed 8 to 12h before. You starta is active when it is full of bubbles.
Everytime you are using your Starta you only use part of it and keep some in the bottom of the jar for next time. You never use it all unless you want to get rid of it.
That sounds exhausting! What about when you have a life out of baking?
There is now multiple options :
Leave it at room temperature all the time
You are a crazy baker or have a lot of mouths to feed or a bakery?
You can feed it everydays (you can even feed it every 8h if you need always active Starta aka if you have a bakery) and leave it always in a nice and warm place but not under direct sunlight, covered but not closed tightly (unscrew lid or kitchen cloth)
Use your fridge to slow down the fermentation process
You are a regular baker but not baking everydays.
You can feed your starta, use it 8 or 12h later, feed it again and place it in the fridge to slow down the process. When you need it, bring it back to room temperature and wait for a few bubbles before using it or feeding it again. I don’t give any duration because it will really depend on the temperature and the type of baking you are making. If you make pancakes or cake you can use some of it straight out of the fridge and then feed it again and wait 8 to 12h before making the bread. Your starta can stay in the fridge up to 1week but you will need to feed it again once out before being able to use it. It’s all about anticipation and to be honest I found the fridge technique a little hard to manage and I have killed a few Starta’s by forgetting about them (holidays…)
Use the freezer to stop the fermentation process and resume whenever you are ready.
You like to bake sourdough bread but just whenever you have time for it (like me)
This is the easiest technique that I found after trying many. I store my Starta in the freezer. Take it out, leave it to thaw at room temperature, feed it, wait 8 to 12h, use some of it for bread, freeze the rest, etc. You can do that as many times as you want your Starta will still be all good (please do not use that technique with your kids that wouldn’t work as well). You still need to anticipate but it’s always the same process and there is not any risk of it to die.
example of timeline day 1 evening I take Starta out of the freezer, day 2 morning feed it, day 2 late afternoon make the bread dough using active starta and place the rest of Starta in the freezer, day 2 evening place the bread dough in the fridge, day 3 afternoon bake the bread. Day 4 you enjoy fresh sourdough bread for breakfast FINALLY !!!!!!!!! don’t worry it will last you a few days ! just the time to start it all again!
And don’t worry if you have no idea how to make sourdough bread. I got you covered with that very long post about it here 😉
If you have any questions or want to share the name of your Starta, that’s what the comment area is for (it’s not very pretty but it works anyway…) because I’m a better baker than a web developer.
Je n’ai pas d’enfants et je n’ai pas d’animaux domestiques, mais j’aime quand même élever des êtres vivants. J’ai une grande passion pour les aliments fermentés et le pain fermenté, c’est-à-dire le pain au levain.
Cet article sera, je l’espère, un court mémo expliquant comment je parviens à maintenir mon starta en vie sans faire du pain tous les jours et sans gaspiller trop de farine. Il existe de nombreuses façons de faire cela, ceci n’est que ma méthode. Je souhaite que vous puissiez vous en inspirer si vous cherchez un moyen simple de faire de la pâtisserie au levain avec un levain sain.
Créer un levain
Pour créer un levain à partir de zéro, vous avez besoin de :
- Farine T65 ou plus (ou un mélange de farine complète et de farine T65 en proportion équivalente)
- Eau du robinet aérée 12 h ou bouillie puis refroidie
- 1 grand bocal
Il est important d’être régulier sur l’heure à laquelle vous nourrissez votre levain.
Jour 1 : Mélanger 25 g de farine et 25 g d’eau (éventuellement une cuillère à café de sucre) dans le bocal, je mets le couvercle dessus sans le fermer hermétiquement (poids total : 50 g)
Jour 2 : A ce stade les premières bulles se forment. Ajouter 25 g de farine et 25 g d’eau, mélanger, refermer (poids total : 100 g)
Jour 3 : A ce stade il y a de plus en plus de bulles et le levain commence à sentir un peu acide. Ajouter 50 g de farine et 50 g d’eau, mélanger puis refermer (poids total : 200 g)
Jour 4 : A ce stade il y a de nombreuses bulles et votre levain prend une texture mousseuse. Prélever 100 g de levain (à utiliser dans gâteau ou pancakes) puis ajouter 50 g de farine et 50 g d’eau, mélanger puis refermer (poids total : 200 g)
Jour 5 : idem que jour 4
Vous l’avez compris, il s’agit toujours de doubler le poids du levain en respectant toujours 50% de farine et 50% d’eau. Si au bout de 4-5 jours vous ne voyez toujours pas de bulles, vous pouvez recommencer.
Oui, j’ai copié-collé cette méthode du blog de ma sœur car c’est ce que j’ai utilisé la dernière fois que j’ai créé un levain. Je vous invite à le visiter et essayer sa méthode de pain au levain également!
Vous pouvez aussi demander à votre boulangerie préférée ou à un ami boulanger s’ils sont prêts à vous donner un peu de leur levain.
Utilisation de votre levain
Maintenant que vous avez votre levain, félicitations, donnez-lui beaucoup d’amour et un nom pour le fun.
Comme vous l’avez compris, pour rester en vie, le levain a besoin d’être nourri, il va donc toujours grossir, vous pouvez donc facilement en donner ou l’utiliser pour tout projet de boulangerie ou pâtisserie pour remplacer ou compléter la levure.
La plupart du temps, lorsque vous souhaitez utiliser du levain, vous avez besoin de levain actif. Cela signifie que le levain a été nourri 8 à 12 heures auparavant. Votre levain est actif lorsqu’il est plein de bulles.
Chaque fois que vous utilisez votre levain, utilisez en seulement une partie et gardez-en un peu au fond du bocal pour la prochaine fois. Vous ne l’utilisez jamais en totalité, sauf si vous voulez vous en débarrasser.
Ça a l’air épuisant ! Et quand tu fais autre chose dans ta vie que du pain?
Il y a maintenant plusieurs options :
Laissez-le toujours à température ambiante
Vous êtes un boulanger fou ou avez beaucoup de bouches à nourrir ou une boulangerie?
Vous pouvez le nourrir tous les jours (vous pouvez même le nourrir toutes les 8h si vous avez besoin d’un levain toujours actif ou si vous avez une boulangerie) et le laisser toujours dans un endroit agréable et chaud mais pas sous la lumière directe du soleil, couvert mais pas fermé hermétiquement (couvercle dévissé ou torchon de cuisine)
Utilisez votre réfrigérateur pour ralentir le processus de fermentation.
Vous êtes un boulanger régulier mais vous ne faites pas de pain tous les jours?
Vous pouvez nourrir votre levain, l’utiliser 8 ou 12 heures plus tard, le nourrir à nouveau et le placer au réfrigérateur pour ralentir le processus. Lorsque vous en avez besoin, ramenez-la à température ambiante et attendez quelques bulles avant de l’utiliser ou de le nourrir à nouveau. Je ne donne pas de durée car cela dépend vraiment de la température et du type de pain que vous préparez. Si vous faites des pancakes ou des gâteaux, vous pouvez en utiliser une partie directement à la sortie du réfrigérateur, puis le nourrir à nouveau et attendre 8 à 12 heures avant de faire le pain. Votre levain peut rester au réfrigérateur jusqu’à une semaine mais vous devrez le nourrir à nouveau une fois sorti avant de pouvoir l’utiliser. Tout est question d’anticipation et pour être honnête, j’ai trouvé la technique du réfrigérateur un peu difficile à gérer et j’ai tué quelques Starta en les oubliant (vacances…).
Utilisez le congélateur pour arrêter le processus de fermentation et le reprendre quand vous voulez
Vous aimez faire du pain au levain mais seulement quand vous avez le temps (comme moi)
C’est la technique la plus facile que j’ai trouvée après en avoir essayé plusieurs. Je stocke mon levain dans le congélateur. Je le sors, je le laisse décongeler à température ambiante, je le nourris, j’attends 8 à 12 heures, j’en utilise une partie pour le pain, je congèle le reste, etc. Vous pouvez faire cela autant de fois que vous voulez, votre levain sera toujours bon (s’il vous plaît, n’utilisez pas cette technique avec vos enfants, cela ne fonctionnerait pas aussi bien). Vous devez toujours anticiper mais le processus reste identique et il n’y a aucun risque qu’il meure. Il suffit juste de trouver votre chronologie.
exemple de chronologie : jour 1 soir je sors Starta du congélateur, jour 2 matin je le nourris, jour 2 fin d’après-midi je fais la pâte à pain en utilisant du Starta actif et je place le reste de Starta au congélateur, jour 2 soir je place la pâte à pain au frigo, jour 3 après-midi je fais cuire le pain. Jour 4 vous dégustez du pain au levain frais pour le petit déjeuner ENFIN ! !!!!!!!! ne vous inquiétez pas il vous durera quelques jours ! Juste le temps de tout recommencer !
Et ne vous inquiétez pas si vous n’avez aucune idée de comment faire du pain au levain. Je vous ai déjà écrit un très long article avec pleins de photos sur le sujet ici 😉
Si vous avez des questions ou que vous voulez partager le petit nom de votre levain, c’est à ça que sert la zone de commentaires (qui n’est pas très jolie mais fonctionne quand même…) en effet je suis une meilleure boulangère que développeuse web.

Pingback: My sourdough bread - Mon pain au levain - Eva Hut